

Stripe is an international payment gateway that allows your customers to make secure online payments using credit or debit cards and other supported payment methods.
Once connected with your store, customers can pay directly during checkout, and successful payments will be updated automatically in your order.
To use Stripe in your store, you need to:
- Create a Stripe account.
- Complete the Stripe account setup and verification.
- Obtain your Stripe live API keys.
- Enter the API keys into your NextGen admin.
Step 1: Create a Stripe Account #
1. Go to this link to Create account –> https://dashboard.stripe.com/register
2. Enter your email, full name, and password, then click Create account.
3. Check your email inbox and click the verification link sent by Stripe
4. Open the email and click the verification link to verify your account.
After creating your account, you can access Stripe’s Sandbox environment for testing. However, you must complete the account activation and verification process before accepting actual customer payments.
Step 2: Complete Your Stripe Account Setup #
1. Log in to your Stripe Dashboard.
2. A Setup guide will appear on the right side of the Dashboard.
3. Follow the Stripe Setup guide and complete all required account verification steps before retrieving your live API keys.
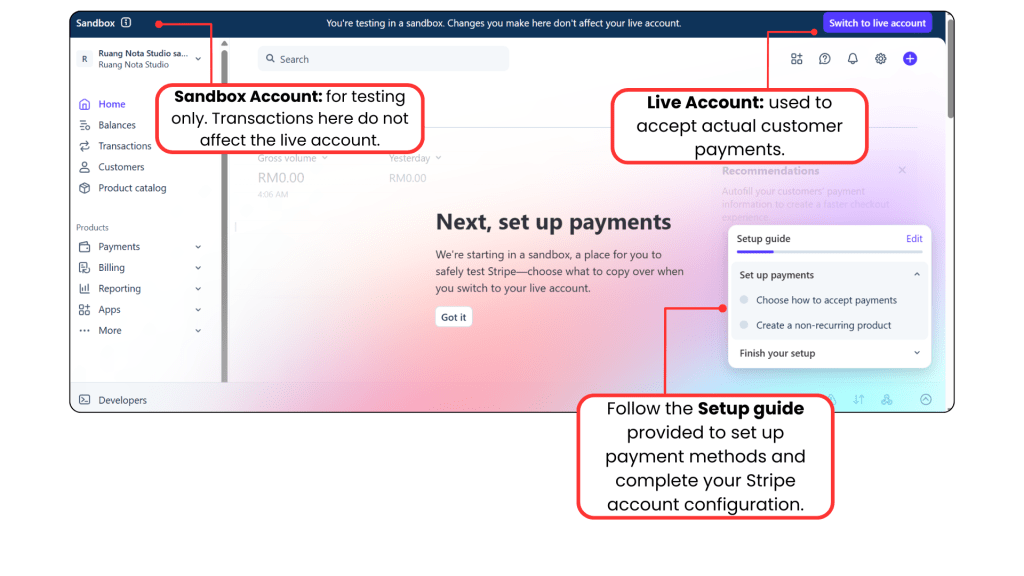
4. After completing the setup and verification, click Switch to live account to access the Live Account.
Stripe provides two account environments:
- Sandbox Account: Used for testing only. No real payments will be processed.
- Live Account: Used to accept actual customer payments.
You must access the Live Account before retrieving the API keys for your live NextGen JOT store.
Step 3: Get Your Stripe API Keys #
After completing your Stripe account setup and verification, obtain your API keys from the Stripe Dashboard.
(1) Open the Developers Section
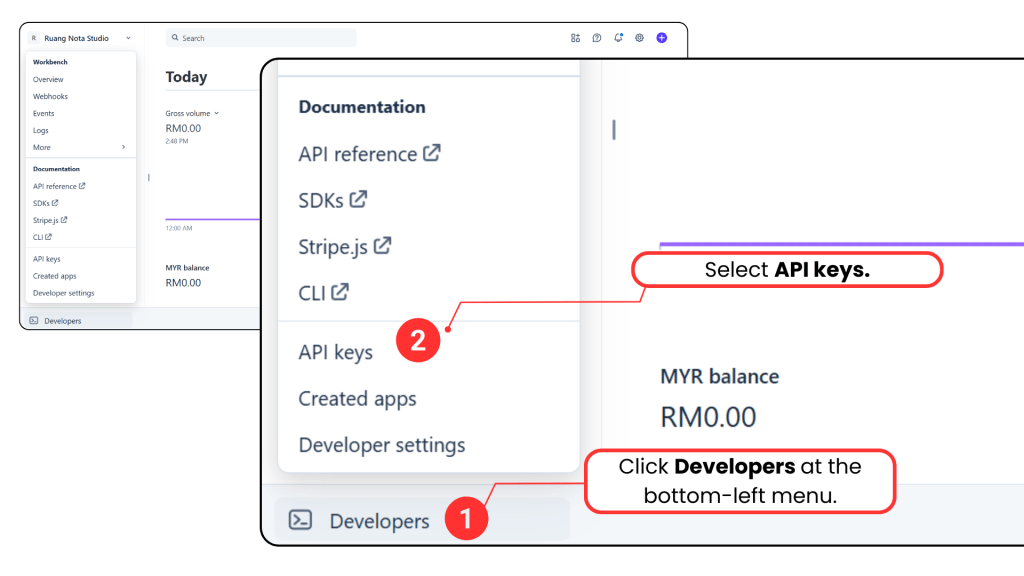
1. From the Stripe Dashboard, click Developers at the bottom-left corner.
2. Select API keys.
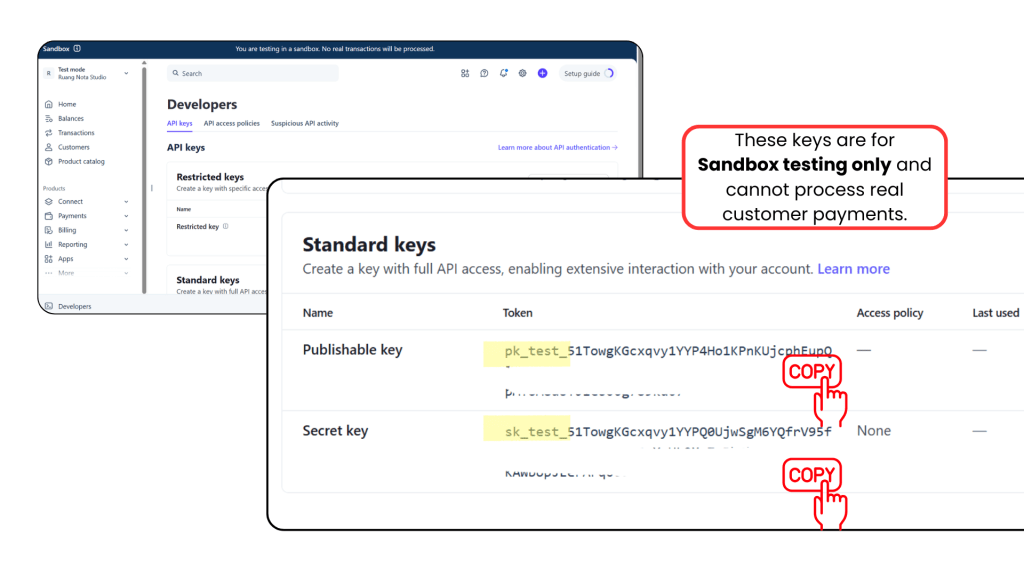
Stripe provides a Publishable Key and a Secret Key for both testing and live payments.
Test API keys are used to test the integration without processing real customer payments.
They normally begin with:
- Publishable Key:
pk_test_ - Secret Key:
sk_test_
Test API keys are for Sandbox testing only and cannot process actual payments.
Stripe Live API Keys
Live API keys are used to accept actual customer payments.
They normally begin with:
- Publishable Key:
pk_live_ - Secret Key:
sk_live_
Make sure you are viewing the API keys under your Live Account before copying them.
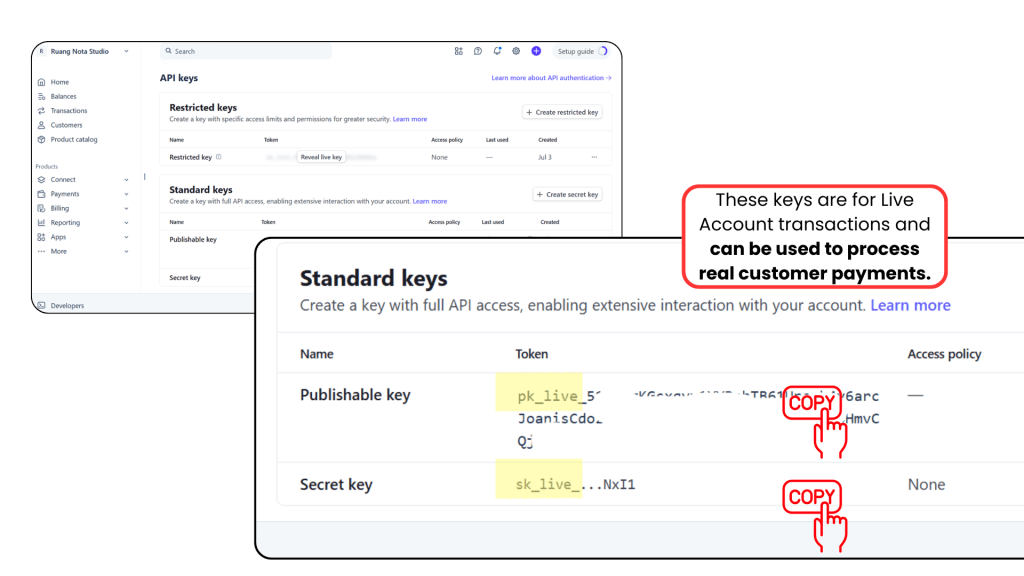
Do not use test API keys in your live NextGen store because test keys cannot process actual payments.
Copy the Stripe Live Publishable Key
1. Under Standard keys, locate the Publishable key.
2. Click the key or the copy icon to copy it.
3. Confirm that the Live Publishable Key begins with pk_live_.
You will enter this key into the Stripe Publishable Key field in your NextGen JOT admin dashboard.
Example:pk_live_...
Reveal and Copy the Stripe Secret Key
1. Under Standard keys, locate the Secret key.
2. Click Reveal live key or the available reveal option.
3. Stripe may ask you to verify your identity using an email, authenticator, or phone verification code.
4. Copy and securely store the Secret Key.
5. Confirm that the Live Secret Key begins with sk_live_.
Example:sk_live_...
Important: Stripe may only display a newly created Live Secret Key once. Copy and store it securely before leaving the page. If the key is lost, you may need to rotate it or create a new key.
Step 4: Connect Stripe with Your Store #
After obtaining the Stripe live API keys:
1. Log in to your NextGen admin dashboard.
2. Go to menu Setting → Payment → Find Stripe from the list → Click Connect
3. A pop-up window will appear for you to enter the Stripe API keys.
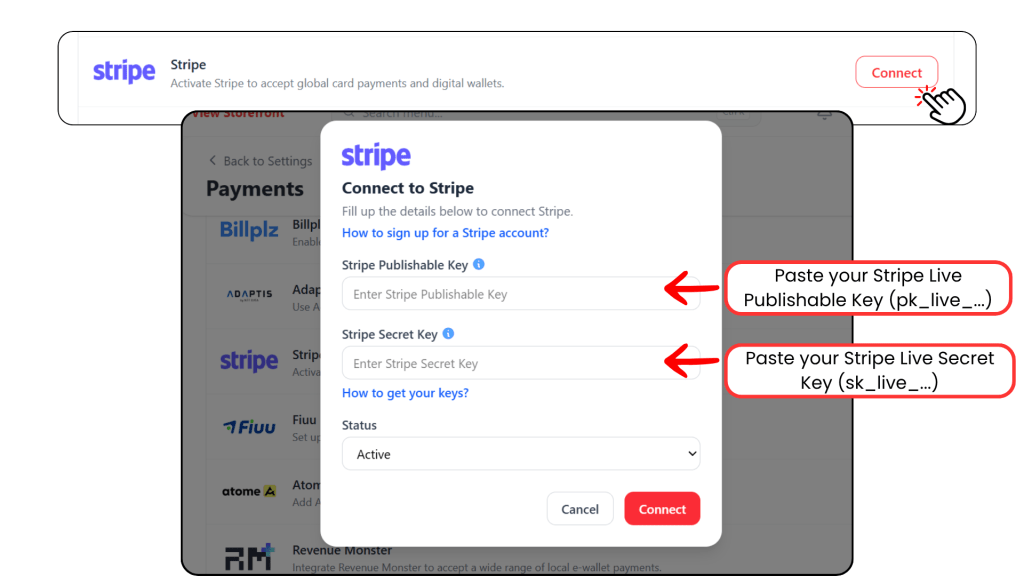
Enter the following information:
- Stripe Publishable Key > Paste the Stripe live Publishable key beginning with: pk_live_
- Stripe Secret Key > Paste the Stripe live Secret key beginning with: Sk_live_
Under Status, select:
Active : Setting the status to Active allows Stripe to appear as an available payment method at your store checkout.
Last Step: Test the Stripe Payment Method #
After connecting Stripe, open your web store and complete a small-value payment to ensure the payment process and order status are working correctly.